Difference between revisions of "Converting to WebCustomUI"
m (6 revisions imported) |
|||
| (4 intermediate revisions by the same user not shown) | |||
| Line 1: | Line 1: | ||
| − | Converting your project to | + | Converting your project to [[WebCustomUI]] is now performed in a simple process. |
=== Step 1 === | === Step 1 === | ||
Make a backup of your Xojo project just in case. | Make a backup of your Xojo project just in case. | ||
| + | |||
===Step 2=== | ===Step 2=== | ||
| Line 9: | Line 10: | ||
[[File:CopyPast_WebCustomUI.png]] | [[File:CopyPast_WebCustomUI.png]] | ||
| + | |||
===Step 3=== | ===Step 3=== | ||
In your project, click on the "Run" button to make sure that everything is working correctly after importing WebCustomUI. | In your project, click on the "Run" button to make sure that everything is working correctly after importing WebCustomUI. | ||
| + | |||
===Step 4=== | ===Step 4=== | ||
In the Menu click on File -> Save As... | In the Menu click on File -> Save As... | ||
And select the ".xojo_xml_project" format. | And select the ".xojo_xml_project" format. | ||
| + | |||
===Step 5=== | ===Step 5=== | ||
| − | Open the Web CustomUI Converter project, and click the Run button | + | |
| + | <code>Web CustomUI Converter.xojo_binary_project</code> | ||
| + | |||
| + | Open the Web CustomUI Converter project, and click the Run button. | ||
[[File:WebCustomUI_Converter.png]] | [[File:WebCustomUI_Converter.png]] | ||
| Line 24: | Line 31: | ||
===Step 6=== | ===Step 6=== | ||
Click the "Open Project" button and locate your freshly saved project in xojo_xml_project format. | Click the "Open Project" button and locate your freshly saved project in xojo_xml_project format. | ||
| + | |||
===Step 7=== | ===Step 7=== | ||
Your project is automatically converted and all controls "should" now use the new UI_ controls. | Your project is automatically converted and all controls "should" now use the new UI_ controls. | ||
The project is opened in Xojo after the converting all controls to their UI_ equivalent. | The project is opened in Xojo after the converting all controls to their UI_ equivalent. | ||
| + | |||
===Final step=== | ===Final step=== | ||
Set each WebPage to use the stUIBackground Style and Run your project to verify that everything was converted correctly. | Set each WebPage to use the stUIBackground Style and Run your project to verify that everything was converted correctly. | ||
| + | |||
| + | ==See Also== | ||
| + | |||
| + | [[WebCustomUI]], [[CustomUI]] | ||
Latest revision as of 13:21, 6 August 2015
Converting your project to WebCustomUI is now performed in a simple process.
Step 1
Make a backup of your Xojo project just in case.
Step 2
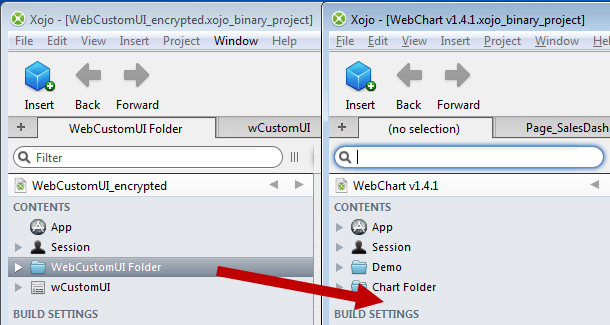
Copy-paste or Drag&Drop the WebCustomUI Folder from the WebCustomUI project into your own project.
Step 3
In your project, click on the "Run" button to make sure that everything is working correctly after importing WebCustomUI.
Step 4
In the Menu click on File -> Save As... And select the ".xojo_xml_project" format.
Step 5
Web CustomUI Converter.xojo_binary_project
Open the Web CustomUI Converter project, and click the Run button.
File:WebCustomUI Converter.png
Step 6
Click the "Open Project" button and locate your freshly saved project in xojo_xml_project format.
Step 7
Your project is automatically converted and all controls "should" now use the new UI_ controls. The project is opened in Xojo after the converting all controls to their UI_ equivalent.
Final step
Set each WebPage to use the stUIBackground Style and Run your project to verify that everything was converted correctly.
